UDG Character Editor window
The UDG Character Editor window is available from the Tools menu.
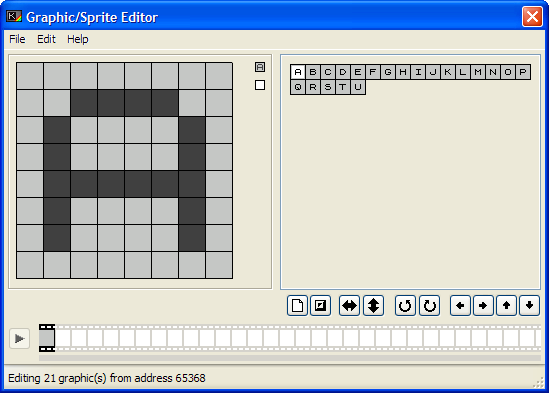
One of the most laborious and time-consuming tasks when programming in BASIC is the construction of UDGs for your programs. There is space in memory for up to 21 of these, and in the past they had to be designed on squared paper, and the binary values of the character's lines calculated and entered in using either POKEs or DATA statements. This situation was made worse when the user wanted to create a custom character set, as all 96 characters could be redefined, resulting in up to 768 calculated values being needed.
The UDG/Charset editor provides a user-friendly and intuitive graphical interface for creating these characters, and also can produce the DATA statements for you to get them into your program quickly.
Sprites and animations can also be created here, using any data format you need. Sprites however, must follow certain rules: they are measured in bytes - width being 8 pixels per byte. So for a 16x16 sprite, you will use a data format of 2 bytes by 16 bytes. There is more on editing sprites and animations further down this page.
The window comprises the following areas:
Editing grid
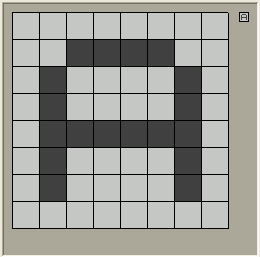
This area represents, in a large form, the 8×8 character grid used to create one character. You can use the mouse in here to set or un-set pixels in the character. You can select the character you want to work on by clicking in the Character Selection Area, and any changes you make will be shown there as you make them.
A preview of your current character is also displayed at the top right of the grid region. This will show multiple characters if you are working with an advanced grid. See the next section for more details on advanced grids.
Advanced grid editing
The grid can be very flexible when editing large numbers of UDGs, especially if they are to be "tiled" (ie, drawn adjacent to one-another on the screen). In this case, you can use the "Grid Setup" option from the Edit Menu's "Grid" submenu. This will bring up the Grid Setup window:
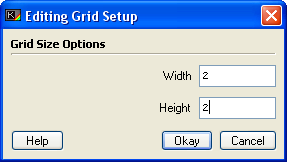
Here you can specify how many characters across and how many characters deep the grid should be. When done, the grid will be expanded (or contracted) showing each character that has been assigned to each "region" of the grid.
This image shows the concept rather better than any words can:
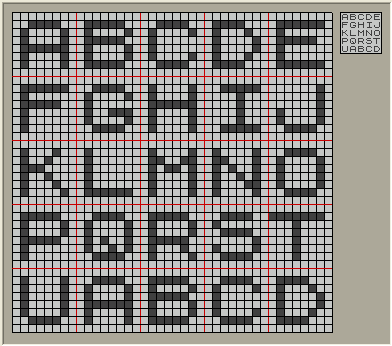
To assign different characters to the grid, click and drag them with the left mouse button from the Character Selection Area. The character you dragged will be assigned to the region of the grid you chose. If you don't want to change the assignment, and simply copy the character's data to the character assigned to a grid region, then drag with the right mouse button.
It is worth noting that another advanced feature of the editing grid is the ability to assign one graphic character to every cell in the grid. This is very handy for editing graphics that will be tiled on-screen, as the preview and the editing grid will show the graphic tiled to the extent of the grid:
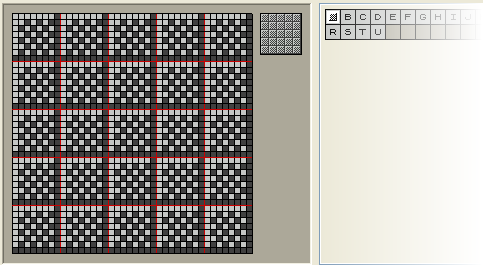
Note: If you assign a character to more than one grid region, then grid operations such as rotation and shifting or flipping will produce results that may damage your character data for that character.
The editing grid also has a number of graphic manipulation buttons when it has been expanded beyond a 1x1 editing area. These are similar in operation to the ones found below the Character Selection area, but work slightly differently:
Button |
Function |
Character operation |
Grid operation |
|
New |
Clears the character being edited. |
Clears all characters assigned to the grid. |
|
|
Flip |
Mirrors the character horizontally or vertically. |
Flips the entire grid contents, does not flip grid assignments. |
|
|
Rotate 90° |
Rotates the character left or right. Only available for square graphics. |
Rotates the grid. Does not change grid assignments, only available for square graphics. |
|
Invert |
Swaps set and unset pixels. |
Inverts the entire grid. |
|
|
Shift |
Scrolls the character (with wraparound). |
Scrolls the entire grid, wrapping at the outer edges of the grid. |
Character selection area

This area, to the right of the window, contains a "palette" of characters available. When editing UDGs, this contains 21 graphics but can be instructed to hold up to 255 characters when editing a custom character set.
Note: Although the editor allows you to work on up to 255 characters, Sinclair BASIC only allows you to redefine the 96 characters used in the character set. You can use the remaining free slots as a "scratch pad" if you wish. There is, however, no restriction on the number of characters (well, up to 255) you can send to the emulated memory or to BASIC.
You can use the left mouse button in a single "click" to send a character to the editing grid. You can also use a "drag and drop" operation on these characters:
- Use the left mouse button to select a character, and without letting go of the left mouse button, "drag" the character to another character in the selection area to make a copy of that character in that cell.
- Use the right mouse button to drag a character to exchange it with the character in the destination cell.
- Use the left mouse button to drag a character to the editing grid, to assign that character to a particular placeholder on the grid.
- Use the right mouse button to copy a character's data from one character to the editing grid. This is the same as copying between characters on the palette using the left button detailed above.
Editing sprites - manipulating the Data Format
The UDG editor can also edit sprites in a format commonly found in spectrum games. UDGs exist in a "1x8" format - that is, they are one byte wide, and 8 bytes high. The Graphic editor can be instructed, when getting data from memory, to read using a different data format. For example, the graphic below exists at address 32768 in memory, and has a data format of "3x21", or 24 pixels wide by 21 pixels high:
![]()
You can specify the data format when using the "Open..." menu item, or when using the "Grab from Specified Address..." menu item. Each of these operations will produce a small dialog where you can specify the format you want to read, and edit the graphics in:
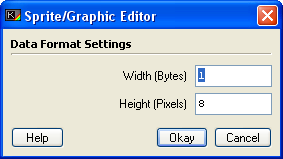
The two numeric fields let you specify the width (in bytes, not pixels!) and the height of the graphic. This format will be used to import your graphics.
Note: The editing grid can be used to edit multiple sprites in the same manner as it can for multiple UDGs.
Animation
The editor supports a "filmstrip" which you can use to build animations. These are fairly useful for "previewing" what your animation will look like when rendered on-screen.

As can be seen in the image above, the filmstrip can be populated by your graphics. To add a graphic, simply drag it from the character selection area, and drop it on the filmstrip. The frame which will receive the graphic will be highlighted - though if you attempt to drop past the last frame occupied, the graphic will be appended to the current animation. Graphics can be inserted between frames by dropping when the "bar" between frames is highlighted.
You can remove a frame by clicking on it in the filmstrip.
Onion-skinning
BasinC's Graphic editor further eases the creation of animations by enabling the user to compare two frames of animation in the Editing grid by using Onion-skinning. This renders the currently selected graphic as normal, but also renders another graphic in lighter-grey, superimposed on top of the current graphic.
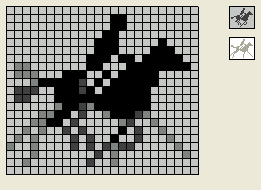
To enable this feature, simply drag and drop one of the graphics in the character selection area to the lower of the two preview regions to the right of the editing grid. All subsequent graphics will be rendered with this second graphic superimposed. This makes changing pixels in an animation easier, with a visual guide. Left-click on the lower graphic to view just the onion-skinned graphic without the current graphic. To remove the onion-skinning, just right-click on the lower graphic.
The Animation Preview Window
By clicking on the small green "play" button to the left of the filmstrip, you can preview your animation.
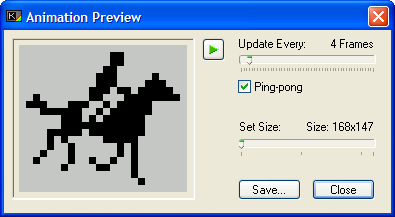
The animation preview window allows you to view your animation.
You can choose to play the animation at various speeds (measured in frames per second), and to scale the image to whatever size is comfortable. Note that this will not alter the size of the animation's frames in the graphic editor - it is meant for preview purposes only. Choosing "Ping-Pong" will play the animation forwards and then backwards repeatedly.
There is also the option to save your animation as an animated .gif file - and this will be saved at the size you specify. This can be handy for web-pages and avatars on web forums.
The Menu strip
The main menu for the UDG/Charset editor allows you to access advanced functions. From left to right, the menu consists of:
The File Menu
Here you can load and save your graphics characters.
- Open�
Brings up a standard Windows file requester which loads as for CODE blocks - you can load BasinC's own .bsc format files into the UDG editor, or load a raw binary file containing the bytes you want. You will need to set the Data Format before bytes can be extracted.
- Import...
This menu gives quick shortcuts to import common graphic sets:
- From UDGs
This option will take the current value of the UDG system variable, and then take up to 21 UDGs from the very upper end of the emulated memory model. This is a quick method of grabbing the current UDGs. Employs a 1x8 byte Data Format.
- From CHARS
Like the "From UDGs" option, this will take 96 characters from the area of memory pointed to by the CHARS system variable, thus enabling you to edit the current character set. This option also employs a 1x8 byte Data Format.
- From Specified Address
This option will open the UDG Grab window and then grab characters from memory using that information.
- From UDGs
- Export...
This menu lets you store your work in the emulated Spectrum's memory model. The Import Binary Objects window will open to facilitate this.
- Save As�
Allows you to save your work as a .bsc format file, or as raw binary bytes. The type saved depends on the file extension specified - .bsc is assumed.
- Exit
Closes the UDG/Charset editor.
The Edit Menu
This menu allows you access to a simple Undo feature, tools for manipulating the grid and individual graphics, and to utilise the clipboard. This clipboard is internal to the UDG editor, and does not give access to the Windows system clipboard.
- Undo
Un-Does the last change you made to the current character.
- Grid
Gives tools for working with the editing grid.
- Setup
Opens the Grid Setup Window to change the size of the editing grid.
- Fill
Fills the grid with the currently selected graphic in the palette to the right of the window. This can be useful for designing graphics that must tile seamlessly.
- Clear
Clears the entire grid, which will also clear all graphics assigned to the grid.
- Invert
Inverts every graphic assigned to the grid, which will invert the entire grid.
- Flip
Brings up a submenu which allows you to flip the entire grid.
- Horizontal
Flips the whole grid left to right. This means that all graphics in the grid will be flipped, and also the data from grid regions at the left of the grid will be moved to the right, and vice-versa.
- Vertical
As for horizontal flipping, but flips vertically, top to bottom.
- Horizontal
- Rotate
Brings up a submenu for rotating the grid. Note: These operations can only be performed on graphics with a square data format (such as 8x8 pixels, or 16x16 pixels).
- 90� Left
Rotates the whole grid 90 degrees anti-clockwise. As with flipping, this means that not only will each graphic be moved, but characters will assume the data of other characters as they are moved into place.
- 90� Right
Rotates the whole grid 90 degrees clockwise. Operates the same way as the 90� Left option, in that the whole grid is rotated.
- 90� Left
- Shift
Brings up a submenu which gives options for scrolling the grid, with wraparound.
- Left
Shifts the grid left by one pixel. Graphics will overflow into one-another at their edges.
- Right
Shifts the grid right by one pixel. As with all shift operations, graphics will overflow at their edges.
- Up
Shifts the whole grid up one pixel, wrapping around at the bottom of the grid.
- Down
Shifts the grid down one pixel, wrapping round at the top.
- Left
- Setup
- Characters
Provides tools for working with the individually selected (highlighted) graphic in the palette to the right of the window. Many of these operations are similar to the ones for the editing grid, but work in subtly different ways.
- Cut
Stores a copy of the current image on the Graphic Editor clipboard, and clears the current character from the editing grid.
- Copy
Stores a copy of the current graphic on the Graphic Editor clipboard.
- Paste
Retrieves any graphic stored on the Graphic Editor clipboard, and sends it to the currently selected graphic slot, replacing any graphic that is already there.
- Insert New
Inserts a new blank graphic at the currently highlighted position.
- Delete
Removes the currently selected graphic. This will reduce the number of graphics available in the palette by 1.
- Clear
Clears the currently selected graphic to a blank sheet.
- Invert
Swaps the set or un-set state of every pixel in the Editing Grid, thus inverting the character.
- Flip
Brings up a submenu which allows you to flip the currently selected graphic.
- Horizontal
Flips the current character in the vertical plane.
- Vertical
Flips the current character in the horizontal plane.
- Horizontal
- Rotate
Brings up a submenu which allows you to rotate the character by 90 degrees.
- 90� Left
Rotates the current character 90 degrees anti-clockwise.
- 90� Right
Rotates the current character 90 degrees clockwise.
- 90� Left
- Shift
Brings up a submenu, with four options for shifting the current character around the Editing Grid.
- Left
Shifts all pixels one place to the left, with wraparound.
- Right
Shifts all pixels one place to the right, with wraparound.
- Up
Shifts all pixels up one place, with wraparound.
- Down
Shifts all pixels down one place, with wraparound.
- Left
- Export Character
Sends the current graphic to the Import Binary Objects window, for sending to the rest of BasinC's tools and memory model.
- Cut


