The SCREEN$ Image Import tool
The Image Import tool can be found in the SCREEN$ Paintbox.

The image imported allows you to convert your PC graphics in JPEG/PNG/GIF or BMP image to the Spectrum display format and then send them to the SCREEN$ paintbox for further touch-up. The image importer is a complex and powerful tool, and as such warrants close study of the help entry before using it. Images converted to the Spectrum display format rarely come out in a desirable form through simple conversion, and some image manipulation is usually needed before a decent result can be obtained. It is therefore suggested that you read this help entry from start to finish.
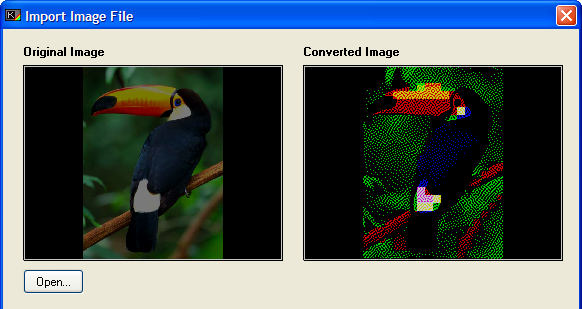
You can import your images by clicking the "Open" button below the leftmost preview pane, or by dragging and dropping your images from Windows Explorer onto the window. The image will be opened and scaled to the correct size for the Spectrum screen, preserving aspect ratio as necessary. This may cause large areas of blank colour to appear at the top/bottom or left/right of the image, and you can choose the colour of this space by clicking the palette at the bottom of the window.
Image resizing and moving
It should be noted that small images will retain their size if they are smaller than the Spectrum screen dimensions (256x192 pixels). They will be positioned in the centre of the screen, but can be moved. More on that later.
Both preview panes can be interacted with. The leftmost pane, which shows the original image, can be used to select a portion of that image to convert. Simply click and drag the left mouse button. The converted portion will be updated in real time in the right hand pane. You can return to the original size by simply clicking without dragging.
The rightmost pane can also be used to set the size and position of the converted image. By clicking and dragging, you can set where on the screen you want the image to appear, and how large it should be.
Colour matching

One of the main problems with converting images to the Spectrum display format is due to the limited palette, and the way that attributes behave. There are at best only 8 colours available, and then only two colours per attribute cell can be used. This is a serious limitation.
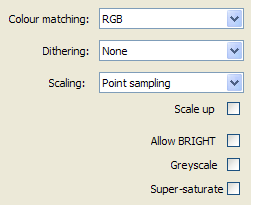
The image importer provides three methods of matching colours, and all three produce different conversions. Some may be better for one of your images, some may not. Experimentation is the key here. The methods are:
RGB - Uses a modified pythagoras formula for determining distance between two colours in three-dimensional space, and takes the two closest matches per attribute cell. Most often produces the best results.
HSV - Instead of matching using the component red, green and blue values of the pixels, this uses their hue, saturation and value. This is best for greyscale images, or those with subtle colour changes.
Threshold - This method is the simplest and fastest matching system available, and produces surprisingly good results. It tends to match most colours with either black or white, and one other palette colour. This produces good results for images with many primary colours.
Back + Colour - Using this method will take the currently selected background colour, and use that as one of the colours in all of the attribute cells. This can be useful in images that are predominantly monochrome in nature, but which do have regions of colour.
Dithering
Any image that is imported is unlikely to look very good if no method of distinguishing between subtle colour changes is employed. To this end, the Image Importer provides dithering options. Dithering is a method of "stippling" pixels of one or another colour, to produce the effect that there are more colours in an image than are actually present. There are many different types, and most of them are available here. Simple dithers such as random-dot and ordered dithering may produce satisfactory results, but you may also opt for more advanced methods which utilise error-diffusion. These methods spread the "error" - the difference between the pixel colour needed and the colour available - out over a range of pixels yet to be processed. By factoring in this error, a dither is gained. This tends to produce swirling patterns in your image, so may not be desirable.
Most error-diffusion dithers do a reasonable job, but may appear washed-out due to the nature of the Spectrum palette. One that appears to work very well with most imported images is the Atkinson dither, which although limited in contrast range, does tend to remove a lot of the wash-out that the other error diffusors produce.
Image Scaling
When resizing an image, it is possible to utilise one of two methods - a "nearest neighbour" pixel resize, and bilinear filtering.
Pixel resizing simply takes away or adds in (depending on whether scaling is done up or down) pixels of the same colour as the nearest neighbour. This can result in a loss of detail and may produce jagginess when scaling up. However, for smaller images this may be desirable.
Bilinear resizing blends pixels and so preserves (to a certain extent) detail and makes for a more pleasing image. If the image to be imported is small and intended to have sharp edges, however, this may not be the resizing method you need.
Other options
Below the drop-down lists are a number of other options that can be used to alter the output.
Scale up determines if small images are to be centred on the screen at their original size, or should be scaled up to fit the full screen resolution.
Allow BRIGHT tells the image converter that you want to utilise the BRIGHT attribute when importing images. This can make images appear too bright and can lead to large rectangular areas of brightness, so may not be appropriate for some images.
Greyscale renders the image internally in greyscales (256 levels of grey) and then uses that in conjunction with a black/white palette to make an image. This can be useful for greyscale images, or images that you intend to colour yourself in the paintbox later.
Super Saturate forces all the colours in the image to saturate to their maximum. Colours that are slightly red will become full red, same for yellow, blue etc. This can make better images, as the colours then more closely match the Spectrum's palette of colours that are also heavily saturated.
Make Selection tells the importer that you want the new image to be sent to the paintbox as a selection instead of replacing the previous image. This will replace any current selection, which will be merged with your old image before proceeding.
Image Colour Adjustments
To the left of the window are four sliders which affect the amount of colour in the image. By adjusting the colours of the original image, you can improve the conversion quite drastically. From top to bottom, these are:

This will affect the overall brightness of the image. Some images convert better if they are darker, as the Spectrum palette contains no dark colours.

This slider will alter the contrast. When increased, dark colours will appear darker, and light colours will appear lighter. When decreased, all colours will gradually fade to grey. Increasing contrast can produce better colour matching results.

Saturation is the amount of colour in the image. No saturation results in a greyscale image, and full saturation makes the colours very strong indeed. Because the Spectrum palette contains mostly fully saturated colours, this can improve colour matching in a similar way to the contrast slider.

Gamma correction can improve an image's range of brightness whilst not making things too dark. It is similar to the contrast slider, but produces slightly more subtle effects. Unlikely to be useful, but is provided to complete the set.