The SCREEN$ Paintbox
The SCREEN$ Paintbox tool can be found in the Tools menu.
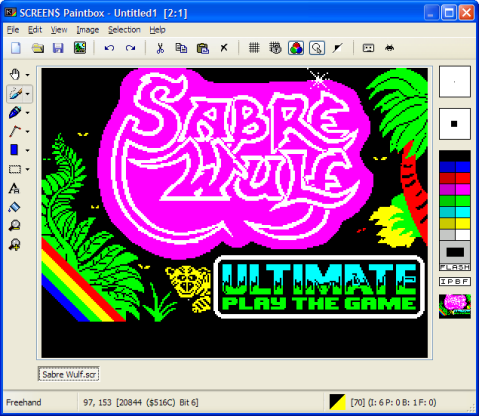
The SCREEN$ Paintbox provides an easy to use, powerful paint package for creating images used by the ZX Spectrum. A wide variety of painting tools utilising a comprehensive Pen/Brush system, coupled with an Image Import system (which allows you to convert your JPEG/PNG/GIF/BMP images to Spectrum .SCR format) makes creating loading screens simple.
The Spectrum Screen
The paintbox is divided into several areas, which will be explored fully throughout this help file, but first it is worth introducing the spectrum screen - Chapter 16 (colours) and Appendix C (the display) have some information, but in a nutshell:
The screen is divided into two areas, or sheets. One sits on top of the other - the lowest being a simple black and white display where pixels are either "set" or "unset". On top of this layer is the attribute layer. This can be thought of as a sheet of coloured cellophane, which adds colour to the black and white layer below it. Although the pixel layer has a resolution of 256x192 pixels, the attribute layer is considerably lower resolution - just 32x24 cells. Each cell can contain two colours, and is 8x8 pixels in size. Pixels in the pixel layer are displayed using the colour information of the attribute cell they occupy - if the attribute cell has an INK value of 1 (blue) and a PAPER value of 6 (yellow) then pixels will appear blue when set, and yellow when unset.
Each attribute cell holds information regarding the INK and PAPER of the cell, and the BRIGHT and FLASH status. BRIGHT means that all colours in that cell will appear brighter than normal, and FLASH means that the INK and PAPER will constantly swap with eachother, producing a flashing effect on the screen.
This has repercussions when working with colour in a paint package - due to the lower resolution of the attribute layer, you will need to take care when placing colours as they will affect all the pixels in their 8x8 pixel range. When moving selections, or panning/skewing or rotating images, the colours may be moved with the pixels, which can cause artifacts to appear in the form of large blocks of colour. This is unfortunately unavoidable, but Spectrum artists have employed many clever tricks in the past which more than makes up for this deficiency.
The Pen and Palette area
Much of the Paintbox's window is self-explanatory, and contains interface items that are common to most Windows applications. Those areas (the horizontal toolbar, the menu and the status bar) will therefore be dealt with later. For now, there are two areas that need explanation so we shall start with the Pen and Palette region to the far right.

This is a vertical strip which contains tools for changing the "pen" that is used for drawing, the "brush" that is used for filling regions, the colours used for drawing and how those colours affect other colours, and also provides a small preview of the screen you are editing.
One thing that should be borne in mind is that BasinC's Paintbox allows you to use any Spectrum graphic that you have access to as a pen for drawing. There are a set of default pen shapes, default fill styles, and also the current character set, the ROM character set, the UDGs, block graphics etc. You can also use any graphic you have edited in the Graphic/Sprite editor, and even promote your Paintbox selections to pen shapes. You can also create your pen from scratch by setting some simple parameters.
Likewise, the fill style can also be any of the available graphics, and instead of a "pen creator" tool for fill styles, there is an optional dithered gradient fill creator. Small previews of the current pen and the current fill style are the topmost two white boxes in the Pen and Palette region. Clicking on either will open either the Pen creator window or the Fill Style window respectively.
Below the fill style preview box, the palette can be seen. This is a double-columned rainbow coloured set of boxes, each of which represent one of the colours that the Spectrum can display. To choose a colour, use the left mouse button to select INK, and the right mouse button to choose PAPER. The left-most column shows non-BRIGHT colours, and the right-most shows the BRIGHT colours. Because BRIGHT applies to bothe INK and PAPER, selecting a BRIGHT or non-BRIGHT colour will change both INK and PAPER's BRIGHT value. The box below the colour palette shows your current selection - INK represented by the small rectangle drawn in a larger rectangle of PAPER.
Below the palette, there is a small box with the letters "IPBF" inside. These are the attribute flags, and make BasinC's Paintbox a very useful tool when working with colour. By clicking the left mouse button on any of these letters, you can enable or disable painting with INK, PAPER, BRIGHT and FLASH. This means that when you draw, only the colour information you have chosen to affect the canvas will be used, and any colour information that is unaffected will remain. For example:
The user chooses to draw in Cyan INK, Blue PAPER, but wants to leave the BRIGHT values of pixels on the painting canvas alone - so by clicking the "B", it becomes disabled. The user can then draw with Cyan on Blue, without affecting BRIGHT in any attribute cells that are painted in. Similarly, to replace only the INK of attributes painted, all three "PBF" flags can be disabled. This effect is used wherever pixels are drawn, including shapes and selections.
Finally, below the attribute flags, there is a small "preview" window. This is a miniature version of the screen you are working on. This is useful when working at high magnification - simply move your mouse over the preview, and a large 1:1 scale image is displayed with a rectangle showing which region of the screen you can see in the main canvas area. Clicking this image will move your field of view to centre on the point you clicked. Move the mouse away from the preview window to dismiss it.
The drawing and painting tools

To the left of the paintbox, there is a vertical strip of tools which are used for painting. Many of these tools have a small arrow to the right of them - this means that when clicked on, that arrow will provide a small menu of related tools. Many tools have two modes of operation, acessed by using the left or right mouse button when painting. For the most part, this will be assigned to painting in INK or PAPER, but some tools, such as the Clone Brush tool, have other uses for the right mouse button. It is recommended that you familiarise yourself with these operations before using them.
Note: There is no Spraycan tool. This functionality is provided by the Pen Creator window, as a density setting. When using a Pen with a density of less than 100%, all drawing with that pen (including shape outlines) will create a spraycan effect.
When describing the functions of the tools, the left mouse button is referred to as "LMB" and the right mouse button as "RMB".
The following table summarises the tools available:
Tool |
Name |
Function |
|
Panning/Scrolling |
Allows scrolling and panning of the image or a selection. LMB Pans, RMB Scrolls. |
|
Rotation |
Use LMB to rotate the image or current selection. Mouse movement left/right whilst holding LMB dictates the angle rotated. |
|
Skewing |
Use LMB to skew the image or current selection. Mouse movement whilst holding LMB dictates amount and direction of vertical and horizontal skew. |
|
Freehand drawing |
Allows freehand drawing. Unconnected will not join up spaces made by fast mouse movements with lines. |
|
Clone Brush |
Copies from one area of the screen or selection to another. Use RMB to set the area to copy from, and then use LMB to paint. Uses current pen shape, but pixel detail is taken from the area chosen. A small crosshair represents the area to be cloned. |
|
Attribute Paint |
Used to paint on the attribute layer only - does not affect pixel states. Subject to the states of the Attribute Flags. |
|
Colour Picker |
When used, the colour picker will alter which colours you paint with based on the attribute cell clicked on with LMB. |
|
Draw Lines |
Creates straight lines using the current Pen. Click to set start/end points. |
|
Shape Tools |
Creates Shapes. Three basic types available, with complex polygons. Click to set centre (or top-left) point and then drag to set size. Optionally uses current pen as outline, and current fill style to fill. Click original start point with polygon to close it. |
|
Selection tools (Rectangle/Freehand) |
Click and drag to set a selection. Freehand updates selection shape as you draw. Use SHIFT to add to current selection, CTRL to subtract, and CTRL+SHIFT to XOR with current selection (Selected areas become unselected, unselected become selected). |
|
Magic Wand |
Click to select a region. Like flood-fill, all connected pixels of the same state will be selected. Use CTRL/SHIFT keys as with the other selection tools to combine or modify existing selections. |
|
Create Text |
Click to set the point at which the text will appear, and then use the Text Dialog to determine content and style. The text position can be moved while the dialog is open. |
|
Flood Fill |
Fills the clicked pixel and any neighbouring pixels of like state with the current fill style. |
|
Zoom Tools |
Allows the user to "zoom" in and out of the image for close work. |
Working with Selections
The Paintbox provides comprehensive and powerful tools for selecting and working with selections. Selections can be of any size, and can be copied and pasted as in any other paint package. They can be sent to the Windows clipboard as Bitmapped images for work in other applications.
BasinC's Paintbox restricts all drawing and painting to the current selection if one is active. And active selection will appear as a blue shaded region with a "Marching Ants" boundary. All tools will work on that selection, and that selection only. Rotating the image will now rotate the selection, as will skewing and panning. Selections can also contain attribute data, so colour can be moved around - though the results of this can be quite ugly if attribute boundaries are crossed.
Selections can be moved by selecting one of the Selection tools and click/dragging the mouse whilst the pointer is in a selected region.
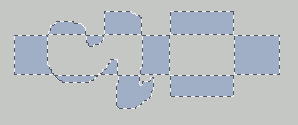
Use the selection tools or the Selection menu to create a selection. When making a selection, you can elect to add or subtract (or do both at once, using the XOR mode) to any current selection. Use SHIFT on your keyboard to add to a current selection. Use CTRL to remove (subtract) from a current selection. Using both SHIFT and CTRL together whilst marking out a selection will use an XOR mode - currently selected pixels that fall into the new selection will become unselected, and vice-versa for unselected pixels.
Use the Selection Menu if you want to specify a precise rectangular selection of known coordinates and size, and also if you would like to shrink or expand your selection. From this menu, you can also load and save your selections to disk.
The Toolbar

Situated at the top of the window, below the menu strip, the toolbar provides access to some common operations that are found in the main menu. From left to right, these are:
New Image - This will create a fresh page to draw on. It will be added to the list of screens at the bottom of the window. No currently opened screens will be closed.
Open Image - This opens a file requester and allows the user to choose a .scr file (or .bin/.bsc file if the filesize matches 6912 bytes) to load. This will replace the current screen, but can be undone if necessary. It is probably best to use the New Image button first.
Save Image - Saves your work. Only saves the currently selected screen. Save formats can be .scr, .bsc, .bin and picture types (.gif, .bmp).
Import Image - Opens the Import Image Window, which allows you to convert your PC-native JPEG/PNG/GIF/BMP images to Spectrum .scr format.
Undo and Redo - Each painting operation can be undone, with an unlimited number of undo steps. Any undo that is performed can be re-done if you end up undoing too much.
Cut, Copy, Paste and Delete - These are the standard operations found in most windows applications. Note that BasinC's Paintbox uses it's own clipboard and not the Windows clipboard - see the help provided later on about using images on the Windows clipboard.
Show Grid - Turns on or off the grid display. The grid is configurable and is useful as a ruler for aligning graphics. It can be configured from the View menu.
Snap to Grid - Enables or disables grid snapping. When enabled, the current mouse pointer coordinates used for painting are rounded to the nearest grid line. Best used when the Grid is displayed, and when the grid is set to 8x8, can be very useful for aligning graphics up to the atribute layer.
Show Attributes - Enables or disables the display of attributes, and reduces the image (non-permanently!) to a black and white image. When some colour combinations are employed, it can be quite difficult to discern individual pixels - turning attributes off helps to alleviate this problem.
Show Pen Shapes - When turned on, this will force a small outline of your current pen shape to be shown when you paint. It can be useful for accurately positioning graphical items and drawings.
OVER 1 Mode - when active this will, instead of painting all pixels to a "set" state, invert the affected pixels instead. So pixels that are set will become un-set, and pixels un-set will become set.
Optimise for Tape - This is a tool which will evaluate all your pixel rows and optimise them for speed. The Spectrum saves 0s faster than 1s in a tape image, and so by flipping all the bits in a particular byte and inverting the INK/PAPER, the image will appear unchanged but will load slightly faster.
Open Graphic Editor - This button will launch the Graphic/Sprite Editor which you can use to create custom pen shapes and brush fills. Any graphics you edit in the Graphic/Sprite Editor will appear in the Pen Creator window.
The Status Bar

The status bar shows some information about what you are doing. To the left is a textual representation of your current tool, followed by pertinant information - coordinates, angles of rotation, rectangle sizes etc. Also displayed is the location of the mouse pointer in display memory.
To the right of the status bar is Attribute Information. When the mouse pointer moves over the main drawing canvas, the current attribute cell is examined and the contents of the colours are sent to the status bar - a small graphical representation (ink on paper) followed by a breakdown of that attribute's INK, PAPER, BRIGHT and FLASH status.
The Menus
Although most of the Paintbox's functionality is available from the many toolbars provided, there are still quite a lot of useful features available from the main menu strip.
The File Menu
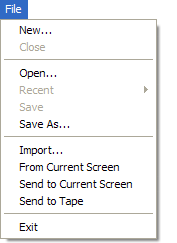
File operations are handled here - standards such as "New", "Open", "Save" and "Close" should be self-explanatory. The "Recent" menu item opens a submenu which contains a list of the last ten opened files.
The next section of the menu contains items for working within the Spectrum system - You can import the current display, and send your creations to it. They should appear immediately.
The "Import" item will open the Import Image Window, which allows you to convert your favourite JPEG, PNG, GIF and BMP files to the Spectrum .SCR format. Also the "Send to Tape" item will save the contents of the current screen out to the Tape Creator Window, where it can be incoporated into your program, perhaps as a loading screen.
The Edit Menu
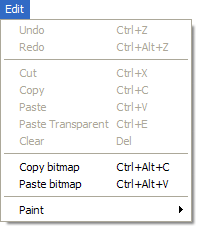
Basic clipboard functionality can be found here, along with Undo/Redo functions. Undo/Redo operate with an unlimited capacity (provided your system has enough memory), and so you can undo mistakes all the way back to your initial empty image if you so desire.
The clipboard functions (Cut, Copy, Paste, Paste Transparent, Clear) operate on an internal clipboard for technical reasons. If you want to copy an image or selection to the Windows clipboard, then use the lower two items - "Copy to Windows Clipboard" and "Paste from Windows Clipboard". The latter, Paste, will bring up the Image Import Window for conversion to the Spectrum format.
Paste Transparent will paste the currently held clipboard image, but will not select unset pixels. This will create a selection with "holes" within - which makes placing text (for example) a lot easier.
Lastly, the "Paint" item will open a set of submenus which allows you to turn off pixel painting (in effect, painting with attributes only) and to set the attribute flags mentioned earlier to affect only the parts of the attribute that you want. You can also set the OVER 1 painting mode here, as mentioned in the toolbar section above.
The View Menu
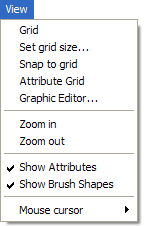
From here you can set up tools that operate on the main canvas but don't affect it. The first is the "Grid" - when enabled, this displays a grid overlay on the canvas that can be used to make aligning graphics and text easier. You can set the size using the "Set Grid Size" option, which will open the Grid Size Window. You can also "Snap to Grid", which will cause all drawing tools to keep to grid lines. By default, the grid is 8x8 attribute sized for convenience, but it can be any size you choose.
Choosing "Attribute Grid" will display (or hide, if disabled) an 8x8 grid which shows the attribute boundaries. Note that this is different from the Grid settings, and cannot be resized - it also displays as a different colour to your custom editing grid.
Selecting "Graphic Editor" will open the Graphic/Sprite Editor. This allows you to quickly edit custom sprites and other graphics that you might be using for pen shapes and brush fills.
"Zoom in" and "Zoom out" items behave exactly as do the toolbar icons - they increase and decrease the magnification of the canvas area.
"Show Attributes" turns on and off the attribute layer. This can be useful when working with images that have a lot of colour - and because attributes can have the same INK and PAPER values, the pixel layer can become impossible to see.
"Show Brush Shapes" adds a small helper that follows the mouse - an outline of your current pen image. You can place your graphics precisely using this option. Any tools (such as the Attribute Paintbrush) which use attributes will display an 8x8 outline which snaps to the current attribute the mouse pointer occupies.
Finally, the "Mouse Cursor" menu opens a submenu where you can decide how your mouse pointer is to be shown when over the editing canvas - either invisible (useful if Brush Outlines are enabled) , a windows pointer or a crosshair. None of these will affect painting.
The Image Menu
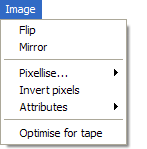
The Image menu provides various operations that work on either the image as a whole, or your current selection. "Flip" and "Mirror" will invert the image or selection in the vertical and horizontal planes, along with their attributes. "Pixellise" opens a sub-menu which offers pixel sizes of 2x2, 4x4 and 8x8 - the image or selection is then converted into a grid-like image with cells of those sizes. In this case, attributes will not be changed.
"Invert Pixels" will flip the set/un-set state of every pixel in the image. A similar operation for the attributes is available in the "Attributes" submenu - "Invert INK/PAPER" will swap all the ink and paper values, and there are also options to remove both BRIGHT and FLASH flags from the attributes of the image or the selection.
"Optimise for Tape" works on the principle that when saving an image to cassette tape for loading into a real spectrum, pixels (as bits in the display bytes) will take longer if they are set than if they are un-set. This option therefore runs through the whole image and evaluates the number of set pixels versus the number of un-set pixels in each character square. If the number of set pixels is the greater, then the attributes INK/PAPER are reversed, and the pixels of that character square are inverted also. This can shave off quite a large amount of time for some images when they load.
The Selection Menu
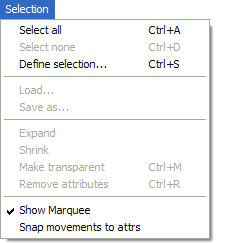
This menu provides a number of tools for working with selections. Selections can be loaded and saved to disk for use later. Selections can also be created here - "Select All" and "Select None" are pretty self-explanatory, and the "Define Selection..." option brings up a small dialog which allows you to specify precisely the coordinates for a rectangulare selection, and the mode (Replace, Add, Subtract, XOR) with which it should be combined with the current selection (if one exists).
"Expand" and "Shrink" add and replace one pixel to the area that is selected respectively, and works with all selection types. Bear in mind that shrinking a selection too far can leave you with no pixels selected. "Make Transparent" un-selects all pixels that are unset within the selection. This is useful for quickly selecting a sprite or character - drag a rectangular selection around it, and then use this option. This is also useful for creating new Pen shapes, as the new selection will be added to the Pen Creator Window.
"Remove Attributes" will remove any colour information from the current selection. This information will be lost forever, so be careful when using it. The only information that will remain will be the set/un-set state of any selected pixels.
The "Show Marquee" item will enable or disable the highlight used to mark selections on the screen, effectively hiding it.
Finally, "Snap Movement to Attrs" will lock the selection to a grid with a granularity of 8x8 pixels - making lining up colourful selections easier and avoiding colour clash.


